Wednesday, December 28, 2011

Dry Fruits Burfi

It is almost a month since my last post. A big sorry to all my dear readers!! I was so caught up with my work. I wonder how critical situations come up exclusively at the year end. However, I'm happy that I could fix them all to the satisfaction of the customers and I'm eagerly waiting for the new year now. This kept me completely away from the Blogosphere. I neither looked up my own space nor visited other blogs too. Hopefully, the new year permits me more time for my hobby :)

Another Blog Hop series today, an exciting event hosted by Radhika of Tickling Palates. This time I got the opportunity to visit Nirmala's Kitchen. She hosts a variety of authentic Indian recipes in her blog and as usual, had a little confusion what to try. Recently, during one of my conversations with my German colleague, I was telling him that sweets make an integral part of any festival or special occasion in India. He said, "Oh! Do you make sweets too? I thought, Indian cuisine is mostly with spices and curries". Then, I explained him the importance of sweets in India and also gave him a brief intro to some renowned sweets like Gulab Jamun, Rabri, Jilebi, etc.


After all these, I got a craving for our Indian sweets. If I say, I have a sweet tooth, it would be an understatement. I think, all I have are sweet teeth :) And, look at this, Nirmala has a variety of sweet dishes to offer. And I selected this Dry Fruits Burfi. It was a little different and packed with healthy dry fruits and hence gave a try. The original recipe can be found here. I made some small changes and hence giving you my version too.

Preparation Time: 40 mins
Makes: 20 - 24 squares

Ingredients:
Mawa - 1 cup
Powdered Almond - 1/2 cup
Powdered Cashews - 1/2 cup
Dried figs - 1/4 cup, finely chopped
Dates - 1/4 cup, finely chopped
Pistachios - 1 Tbsp, finely chopped
Sugar - 1 1/2 cups (or less)
Water -1cup
Cardamom powder - a pinch
Ghee - 2 tsps

Method:
In a heavy bottomed large pan, heat a teaspoon of ghee. Roast the chopped figs, dates and pistachios lightly. Then, add the powdered almond, cashews and mawa. Mix well and roast gently. When it gets a little brown and emanates fine aroma, remove from heat and save aside.

In the same pan, heat water and sugar to prepare the sugar syrup. When the syrup attains one string consistency, add the cardamom and the mawa mixture. Mix well and cook in medium heat till it leaves the sides of the pan and gets into one big ball.

Grease a square tin with the rest of the ghee and pour the hot mass into it. Spread and let it cool for some time. Cut into squares and serve.


Verdict:
We found the Burfi extraordinarily tasty and different from the usual Besan ones. It is packed with healthy ingredients and rich with dried fruits. I'm sure, they would definitely delight kids and adults alike. However,  I used less sugar than mentioned in the original recipe and yet it was a little too sweet. May be the added dates brought in those extra sweetness. So, if you want it just delectable, it is advisable to reduce the amount of sugar to be used.

I would definitely be making these Burfis again. May be try it with jaggery too. Thanks Nirmala for this sweet power packed snacks. Sending this as an entry to Blog Hop Week 12.


Wednesday, November 30, 2011

Banana Fritters

Everyone and everything here awaits Christmas now. It gets dark around 5pm and wherever you turn, you see cute little lights and candles, adorning huge and small christmas trees. The shops, malls, houses, railway stations and even my office has got the new Christmas look now. In Germany, Advent is celebrated as a tradition awaiting Christmas. It marks the four weeks before Christmas. Every week, one of the four candles in the advent wreath is lighted until Christmas. You can find more info in http://www.german-way.com/christmasAdv.html. It is really fascinating to know such things about the traditions and cultures in the lives of people in different countries.


Now, coming to the post, this is yet another entry for the Blog Hop Wednesdays, an event by Radhika of Tickling Palates. This time, I got the chance to visit Jabeen's Corner. I have been following her space for quite some time now and I really find her space interesting. The way she narrates things sometimes makes me feel as if I'm hearing her in person and the liveliness in her tone is contagious. I'm glad I got a chance to try something from her blog. As always, we (I and my husband) were browsing through her posts and when we saw Banana Fritters, we at once knew - that's it.


Banana Fritters, known as 'Pazham Pori' regionally, is a famous tea-time snack in Keralite households. As I'm writing the post, it brings me some of the unforgettable memories in my life. I very well remember where I first tasted these gorgeous snack. During our final year Engineering studies, we, a group of four friends were staying at one of our Keralite friend's house in Trivandrum, for doing our Project Work. Her mother is a wonderful cook. Inspite of her full time job, she passionately cooked varieties of tasty dishes for us all. Every evening, after we return tired from our day's work, we would find something special and tasty awaiting us in the dining table, along with tea. We used to savour these as hungry birds, chit-chatting and drinking tea. One such evening was when I got to taste these. It was wonderful that even banana can be fried and it tasted really awesome.

After that, it was in my in-laws place where I tasted them again. My husband's native is a town located quite close to the Kerala border in Tamilnadu and strongly influenced by Kerala cuisine. Every often, my mother-in-law would prepare these simple delicacies. It would all vanish within a few minutes, as everyone in family likes them. I, myself, have never prepared these and it's quite been some time sinced we ate them last. Well, now you could imagine my husband's enthu on seeing this in Jabeen's Corner.


I went ahead straight away and prepared these last Sunday. The recipe is so so simple, that there is really no need to repeat it. You can find it here. Just prepare the batter, dip the banana pieces and fry. You'll be surprised at the number of pieces easily going into your mouths within minutes.

Notes:
  • The banana should be really ripe enough for a good taste. Long yellow coloured variety (Yethampazham) is well suited.
  • I did not use turmeric, as like my mother-in-law's recipe.
  • The amount of sugar can be adjusted according to the sweetness of the banana. It can very well be replaced with honey or maple syrup.
Thanks again Jabeen for the recipe. Happily sharing this with Tickling Palates' Blog Hop Wednesday - Week 10.

Saturday, November 26, 2011

Meen Kuzhambu

Hurrayy!! I have spotted the first snow of the year. The sight of fresh snow is always a delight to me. A thin layer of soft white powder is seen over roof tops of houses, on car glasses,  on the pavement, on every single blade of grass and on every single grain of sand. When I tread over the snow covered pathway, I can feel the softness even under the thick boots. I wonder how it would feel if I touch it with my barefoot. Even the thought brings a chill to me. Ooohhh! Shivers!!

Most of us would love to watch the rain through a windowpane. It brings an unexplainable pleasure on watching the rain drops dance and drizzle. Where the beauty of rain is in the rustle, the beauty of snowfall is in its elegant hush. Sitting on the couch, cuddling on a soft pillow, a cup of tea in the hand, seeing the gentle snow silver everything outside the window - believe me,  it is a very serene moment. If you have got  snow where you live,  go get yourself a break and don't miss to enjoy what nature offers you.


This weather brings a never ending craving for warm and spicy foods. Last weekend, my husband brought home some fresh fish. My only thought went to the spicy tangy tasty fish curry my mom prepares. Ever since the day I was old enough to appreciate the tastes of food, I am in love with my Amma's Meen Kuzhambu (Fish Curry). I have tasted other lovely preparations of fish too, but this one always tops my favorites list.

Though I could not attain the 100% perfect taste (Amma's Kai manam), I think my preparation was almost as tasty. I'm giving the recipe here and feel free to try and adjust to your tastes.


Serves: 3-4
Preparation Time: 30 mins

Ingredients:
Fish - 1/2 kg
Onions - 2 big, chopped
Tomatoes - 2, diced
Green chillies - 2, slit lengthwise
Fresh Coconut - 1/2, grated or diced into small pieces
Red Chilli powder - 2 tsp
Coriander powder - 1 tsp
Turmeric - 1/2 tsp
Lemon juice - from 1/2 lemon
Tamarind - marble sized
Salt - to taste

Cooking Oil - 2 Tbsp
Mustard seeds - 1/2 tsp
Urad Dal - 1/2 tsp
Fenugreek seeds - 1 tsp
Curry leaves - from 2 twigs

Method:
Clean the fish and cut into pieces. Take 1 tsp of chilli powder, a pinch of turmeric, enough salt and the lemon juice in a bowl. Mix and rub the mixture over the fish pieces gently and keep aside.

Soak the tamarind in warm water in a small bowl. Keep aside.

Blend the grated coconut in an electric blender with little amount of water. Extract the juice out of it. Save this as the first milk. Blend the same coconut again with some more water. Extract the juice out of it and save this as the second milk.

Heat oil (I used gingelly oil) in a wide shallow vessel. Add mustard seeds and urad dal. When the mustards crack, add the fenugreek seeds and curry leaves. Now, add the chopped onions and green chillies and sauté well. When the onions have become soft and translucent, add the diced tomatoes. When the tomatoes are well cooked, lightly mash them and add 1 tsp of chilli powder, coriander powder and enough salt. Cook the spices for a few minutes without burning them.

Now add the fish pieces and one cup of first coconut milk. Close the vessel with a lid and cook in medium heat. Meanwhile, extract the juice out the soaked tamarind. After about 10 mins of cooking, add the tamarind juice and one cup of second coconut milk. Reduce the heat to medium low and cook for a few more minutes.

When little droplets of oil separates out of the curry, it means completely cooked and switch off the heat. Enjoy with fresh steamed rice.


Notes:
  • Depending upon the size of the coconut, you would get 2-3 cups of milk. I got 1 cup of first milk and two cups of second milk, out of which I used one cup only. 
  • My mother blends the coconut in a stone grinder until it get so soft that she adds the coconut directly to the curry instead of extracting the milk. 
  • Always use a wide shallow vessel for fish curries. Do not mix the curry often with a ladle while cooking, as it might break the fish pieces easily.
  • Depending upon the type of fish used, the cooking time might vary. So, keep a careful eye while cooking. I used Red fish / Ocean Perch. You can use any solid fish suitable for curries.
  • The curry tastes better when cooked in an earthen vessel. It tastes even better when served on the next day.

Wednesday, November 16, 2011

Chicken Sukka

Before I could realise, my Blog has turned one. For the past one year, blogging has been more than just a hobby for me. I haven't written a hundred post. However every single post is dear to me and I'm just glad that I'm writing them. It gives me immense pleasure on seeing the growth of my blog with a good number of committed readers. However, I must confess that I'm not writing regularly due to time constraints :( Many ideas still remain just ideas. I hope, the new year would bring a good swing in my blog. Lets hope for the best.


This is yet another post for Blog Hop Wednesdays. This time I got to visit Charishma's blog - Cheri's Stolen Recipes. It is a blog she writes together with her mom. So I expected some traditional recipes and I got more than I wanted. Being a Mangalorean, she has posted a lot of traditional Mangalorean recipes. Every dish was awesome and I was literally drooling at the pictures. My husband and I were sitting selecting the recipes and we really had a tough time choosing one, since we had opened five to six tabs just of her Mangalorean recipes. Finally it was agreed that I make Chicken Sukka this time and the rest later one by one. Believe me, I'm not exaggerating!! Thanks Cherie for such awesome dishes :)

The original recipe be found here. I made very little changes and here is what I used. You are free to change the measurements to suit your taste buds.

Preparation Time: 1 hour
Serves: 3 to 4

Ingredients:
Chicken - 1 kg

Cloves - 4
Cinnamon - 2 small sticks
Onion - 1 thinly sliced, 1 finely chopped
Turmeric - a pinch

Cumin seeds - 2 tsp, roasted
Fenugreek seeds - 1 tsp, roasted
Coriander seeds - 2 Tbsp, roasted
Pepper corns - 20, roasted
Red chillies - 5, roasted
Garlic pods - 4 (with skin)

Coconut - 1 cup, grated
Cumin seeds - 1
Garlic - 2 pods

Salt - to taste
Oil - to saute

For seasoning:
Shallots - 4 big, finely chopped
Ghee - 2 Tbsp
Cashews - a few

Method:
Cut the chicken into grob pieces. Wash and clean with salt and turmeric and keep aside.

In a wok on medium flame, heat some oil. Add the cloves, cinnamon, thinly sliced onions and turmeric and saute till the onions turn soft. Now, add the coriander seeds, cumin seeds, fenugreek seeds, pepper corns, garlic pods and the red chillies one by one and saute for about 5 minutes. Remove from heat and let it cool down. After it is cooled, blend this spice mixture to a coarse paste with little water.

Dry roast the coconut with cumin seeds and 2 garlic pods. Preserve this aside.

Heat a wide bottomed pan and add cleaned chicken to it. Now add three fourths of the spice mixture, salt and 1 chopped onion to it, mix and cook with the lid closed for about 10 minutes.

Blend the rest of the spice mixture with the coconut mixture, again to a coarse paste, with enough water. Now, add this to the chicken, close the lid again and cook again until the chicken is well cooked and soft.

For seasoning, heat the ghee and saute the finely chopped shallots and cashews till light brown. Add to the curry and switch off the flame. Chicken Sukka is now ready to be enjoyed.

Verdict:
Just Fingerlicking good!! The relatively clean plates after the meal stand testimony to the taste of the curry. At first, I was quite surprised by the number of red chillies Cherie has used in the recipe, but however later realised that she has used the mild spiced ones. I was still apprehensive, yet I found that the coconut added reduces the heat of the chillies and increases the taste of the curry multifold.

I have observed that in many of the dishes, she has not used any pre-prepared curry powders. Instead, she roasts and blends the spices freshly before using in the curry. Of course it might be time consuming. But, believe me, it is really worth the effort. I could really feel the freshness of the spices in the curry. The taste reminded me of the curries my mother prepares. My mom blends spices every time for most of the curries in a traditional stone grinder (Ammi in Tamil) even to this day.

Note:
  • I did not have the mild spicy Kashmir red chillies. So, I was a little conservative with the use of the red chillies.
  • A combination of boned and breast pieces of the chicken would be fine for the dish.
  • I blended the spices in an electric blender. I recommend blending in a stone grinder for better results.


Garnish the dish with fresh coriander leaves and serve hot with roti or steamed rice.Sending this as an entry to Blog Hop Wednesday-Week 9 event by Radhika of Tickling Palates.

Wednesday, November 02, 2011

Kadhi Palak

Goldene Oktober (Golden October). I have fallen in love with this phrase which perfectly describes the Fall in Germany. The temperature drops. It is chill everywhere, yet not sharp as a knife. Poets associate the season with the mood of meloncholy. However, to me, the season brings an elegant serenity with it.

I make a stroll in the morning through the parks and fields, to take a whiff of fresh air. The leaves on the trees gradually turn into different shades of green, yellow, orange, red and brown - pale and bright. Some could no longer hold on to the trees and with a heavy heart fall off to the ground, just to  make a soft bed over the wet grass below. There is still a mild fog. I hug on to the warmth of the pullover and I can see my own breath. Piles of pumpkins and dozens of apples are stacked over for sale by the farmers along the fields. The sun shines lazily through the branches of the trees, pouring its golden rays through the branches and coloured leaves, elevating their beauty to a splendid grandeur. Is this not a golden October?

Well, this is something I wanted to share with you before October ends, but I couldn't make it. Now that it is November, winter is on the doorsteps and trees are becoming more naked with every passing day. I got to prepare myself to face the winter.


In the recent past, I have seen many blog posts with lots of sweets and savouries marking the festive season in India. I hope everyone had a memorable and safe Diwali. Now, coming to the purpose of the post, it is yet another entry to the exciting fortnightly event - Blog Hop Wednesdays, organised by Radhika of Tickling Palates. As per the rule of the game, I got the opportunity to visit Anamika of Taste Junction. Oh, I really wonder why I have missed her blog so long. Not just the food and the photography is amazing, but also her write ups give me an interesting read. I'm especially fond of her musings in the Scribbles page. Her blog reflects in a way the wonderful personality she is. Thanks again to Radhika for giving this chance to know such lovely blogs and bloggers.

Choosing a single dish was again a challenge. Baking was a big no and so I searched in Cooking. She has many dishes up her sleeves which are new to me. Finally, I settled down to Kadhi Palak, which was also the lunch menu on last Sunday.


The original recipe can be found here. I followed it almost exactly except the following small changes.
  • I added two large chopped shallots while sauteing.
  • I added few sprigs of flat-leaf parsley at the end. 
  • I forgot to add the Kasuri methi.
I had never prepared any Kadhi before, so this was my first attempt. I was afraid if the yogurt might curdle or if the besan would get more thick than necessary. Nothing of the kind happened. It tasted so delicious and creamy, that I would definitely be making it again and often. My husband too liked it a lot. The spinach and parsley are green leafy vegetables, which are a good source of antioxidants, iron and vital vitamins. This does not take much time and effort to prepare, yet makes a satisfying and healthy meal.


Sending this as an entry to Blog Hop Wednesday-Week 8 event by Radhika of Tickling Palates, Only Curries event by Pari of Foodelicious, guest hosted by Janaki's Kitchen and to Fast Food NOT Fat Food by Priya of Now Serving.


Friday, October 21, 2011

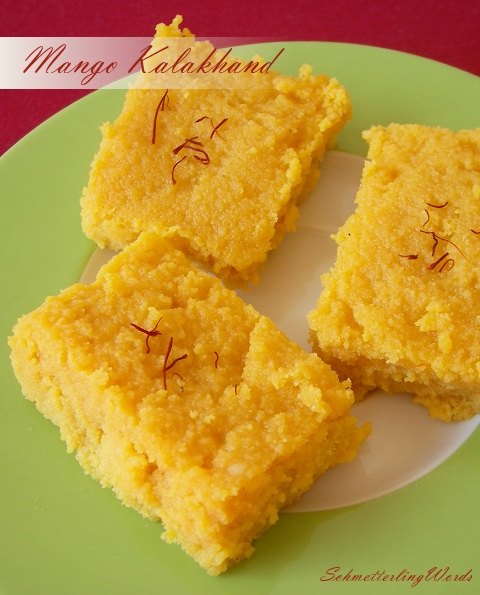
Mango Kalakhand

In India, this is the time when an array of holidays line up the calendar marking the festival season. Celebrations are aplenty and festivals in India are always marked with good food and lots of sweets. I thought, it would be an apt time to share a simple sweet recipe.


I first learnt making Kalakhand from Taste of Pearl City. She showed me her recipe and motivated me to try it. My very first try was a hit. Since then, I've made them quite often, experimenting every time with different flavors. When I made this Mango Kalakhand, I was too excited at the bright orange color, that I thought, this really deserves being photographed. Now that I have these photos uploaded, I thought I could share the recipe too.

Serves: makes about 12 pieces
Preparation time: 18 mins

Ingredients:
Ricotta cheese - 1 cup
Sweetened Condensed Milk - 1 cup
Mango puree - 1/2 cup
Saffron- a few strands soaked in warm milk
Cardamom powder - a tiny pinch
Ghee or butter to grease the bowl

Method:

Take a medium sized microwave safe bowl. Grease with a little ghee. Add all the ingredients in the bowl and mix them well. Microwave it in high for 5 minutes. Take the bowl out, give a stir and microwave again for 5 minutes. Repeat taking the bowl out and stirring and microwave again, but now in 2 mins intervals. Continue until the mixture is no more a liquid and has attained a steady consistency. Take care not to burn.
Now, take the bowl out and spread the mixture in a square tray and let it cool. Cut and enjoy!!

Note:
  • It took in my microwave a total of 18 mins until done. That is, after the first two cycles of 5 mins microwaving, I did three times 2 mins microwaving and two times 1 min microwaving. Just make your best judgement according to your microwave.
  • You can use mango puree from fresh mango pulp. Canned puree (Alfonso) works good as well.
This is sure to delight mango and sweet lovers alike. You can experiment with other flavors too. Chocolate flavor is our favorite too, where you might add a little of cocoa instead of mango puree.

This goes as an entry to Tickling Palates' Diwali Special - Sweets and Savories and Anu's Healthy Kitchen's Diwali - Festival of Lights and Kirthi's Kitchen's Serve It - Festival Potluck, co-hosted by Denny of Oh Taste and See.

Wish you all a Happy Diwali!!!


Wednesday, October 19, 2011

Aloo ke Kofte with Peas Pulao

I wouldn't like to bore you all with the same story again. That I have been busy all these days. Work along with travel :( which has called for an uninformed break from Blogging altogether for a few days. It wouldn't get any better this week or the week after. I'm occasionally opening my dashboard and indeed checking a few fabulous posts from fellow bloggers every now and then. Though I get impressed, I'm unable to leave my comments then and there. I hope they wouldn't be cross at me.


Well, I missed the last round of Blog Hop Wednesdays and this is a sincere attempt to cope up with that. Last Sunday this was our lunch. You got it right. I tried the Aloo ke Kofte from Nisha's Kitchen and Green Peas Masala Rice from Prabha's Samayal. Both are very talented bloggers and indeed I had a really tough time to pick up one recipe from either of their blogs. There were a lot which I wanted to try. But, my idea was to make a lunch and the dishes have to go well with each other. The final outcome was really great and I'm glad about my choices.

Aloo ke Kofte:

The original recipe can be found here.

I followed the recipe almost exactly, except a few changes in the measurements to suit our taste. It was enough to serve two hungry persons.


Peas Pulao:

The original recipe can be found here. Here, I made a few changes and hence providing the recipe as I did.


Preparation Time: 25 - 30 mins
Serves: 3 to 4 persons

Ingredients:
Basmati rice - 2 1/2 cups
Frozen Green Peas - 1/2 cup
Mustard/Jeera - 1/2 teaspoon each
Onion - 1, chopped into thin long stripes
Tomato - 1 chopped
Turmeric powder - a pinch
Green chillies - 2, slit lengthwise
Ginger garlic paste - 1 tsp
Fennel seeds -1/2 tsp
Water - 4 cups

Whole garam masala - a few cardomom pods, cinnamon, cloves
Pandan leaves (Rambai ilai) - a few chopped (optional)
Coriander leaves - few stalks, chopped
Ghee - 1 Tbsp
Oil - 1 Tbsp

Method:

In a rice cooker, heat some oil and/or ghee and add the whole garam masala one by one. In goes now the mustard seeds, jeera, fennel seeds and chopped pandan leaves. Add the chopped onions and green chillies. Sauté them till the onions get translucent. Now add the ginger garlic paste and turmeric and saute till the raw smell goes.

Add in the peas, tomatoes, chopped coriander leaves and required salt. Sprinkle very little water, cover with the lid and let them cook for 5 minutes.

In the meanwhile, wash the rice and keep it ready. Now, add the rice to the cooker along with required amount of water, give a stir and let it cook.

After the rice is ready, fluff with a fork and garnish with coriander leaves before serving.

Note:
  • I prepared the pulao in a rice cooker completely. Alternatively, you can prepare the peas masala separately in a non-stick pan or wok, cook the rice separately and mix both.
  • The addition of ghee and pandan leaves gave the pulao a very distinct irresistible aroma. Yet, they are purely optional.
  • I ommitted the addition of coconut and blending as mentioned in the original recipe. If you wish some extra flavour, go ahead with coconut. Alternatively, you can replace one cup of water with coconut milk instead of blending.
Verdict:

I added some koftes into the gravy and some were saved to snack upon later. The Kofte and the pulao made an incredibly good combination. It was a hearty and comforting meal that we both enjoyed. The fine aromatic mild spiced pulao along with the spicy gravy was a melt in the mouth. My husband asked me, "Why don't you prepare such a meal everyday for me?". Ha ha haa. If I have the time, I would surely love to cook everyday such meals for him :) This alone shows how well we enjoyed this.

Thanks again Radhika for arranging such a lovely event and making us try new food everytime. Sending this to Tickling Palates' Blog Hop Wednesdays Week 7.


Wednesday, September 28, 2011

Apple Walnut Cake

Once again a prolonged absence from active blogging. I have enough reasons for my being busy, the main one being that I am into a new project in my office. New work means new challenges and I'm focussed right now on getting myself acquainted to learning new things. However, I had the weekend to myself and was able to prepare for the Blog Hop. So, here goes my entry for this week's Blog Hop.


This time I got the oppurtunity to visit Jayasri's Samayal Arai. A very versatile blogger - one finds a variety of food from pastas to couscous. I find her blog a global one, with many types of food from across the world. Browsing through her recipes and reading her write-ups was a pleasant experience. She has an impressive collection of eggless baking recipes too. So, I tended towards trying one of her baked goodies.

My choice was to try the Eggless Apple Walnut Bread. But, just while preparing, I found that I had actually ran out of flax seed meal. However, I just went ahead to bake it anyway trusting heavily on the other ingredients mentioned in the recipe. I made quite a few changes to the recipe and hence I'm providing the recipe below. This is a jist of the measurements I used. The original recipe can be found here and feel free to experiment.


Ingredients:
All purpose flour - 150g (1 cup)
Whole Wheat flour - 100g (3/4 cup)
Butter - 40g
Cinnamon - 1/4 tsp
Nutmeg - 1 tsp
Apple Puree/Apple Sauce - 1 cup
Vanilla Essence - 1/2 tsp
Baking Soda - 2 tsp
Baking Powder - 1 tsp
Buttermilk - 150ml
Sugar - 100g
Maple Syrup - 4 tbsp
Walnuts - a handful (coarsely chopped)
Salt - a pinch

Method:
Preheat the oven to 180C. Butter a pound cake tin and keep it ready.

In a bowl, sift together the two flours along with the baking powder, baking soda, cinnamon, nutmeg and salt. Keep it aside.

Take the buttermilk, apple puree, melted butter and the maple syrup in a blender and give it a pulse just to make them come together as a single thick liquid.

In a large bowl, take the blended liquid items. Add vanilla essence and sugar and whisk it for a minute with a hand blender.

To this, add the sifted flour little by little, whisking gently. Throw in the chopped nuts and fold them along.

Pour the batter into the prepared baking tin and bake for about 45 minutes or until a toothpick inserted comes out clean.


Verdict:
The bread's consistency and taste resembled mostly that of a cake. It was so sooo soft and fragile that it just melted in my mouth. With the apt amount of sweetness and aroma, it was an absolute pleasure to the palates. I would like to just repeat Jayasri's statement - it is the softest cake that I've ever baked.

I never felt the absence of egg or even the flax sead meal in the cake. I would definitely be baking it again and thanks a ton Jayasri for providing such a wonderful eggless treat.

A small note: The original recipe calls for about 30-35 minutes of baking. My oven took however longer. Please adjust according to your oven settings. Sending this lovely cake to Tickling Palate's Blog Hop Wednesday - V and Ramya's Recipe's ABC Series - A for Apple.

Wednesday, September 14, 2011

Dulce de Leche Brownies

I can't believe it is time again for the next Blog Hop round. Time - it flies by incredibly fast. Not just initiating the event, Radhika of Tickling Palates does a remarkable job by sending remainder mails to all the participants just in time. This is of immense help to someone like me, who always run after things at the last minute. There by, here is my update for today's Blog Hop Wednesday.


This time, I got to follow Divya's EasyCooking. She is a very established blogger and an experienced cook, blogging since 2008. That is, more than three and a half years!! It is really inspirational to see such bloggers. I suppose her passion towards cooking is what drives her. Keep going Diyva!

Initially, it was a little confusing what to try from the mighty number of more than 480 posts. But then, the situation was so, that I could easily pick out one. We were invited to a friends' house on Saturday, as their parents have come over to visit them here in Germany. So, I wanted to bake something for them and take along. Thus, I confined my search to baking. Thanks to her excellent recipe index, I got what I was looking for.

I selected this absolutely yummy-licious brownies. I had some Argentinean Dulce de Leche, sitting in my fridge and this looked like an excellent opportunity to put it into good use. Ever since I got to know about Dulce de Leche, I'm in love for that. In Frankfurt, it was not a problem to find an Argentinean shop where you get ready made yet authentic Dulce de Leche and you don't have to make the boiling condensed milk experiments and all. I've already baked some muffins with them which were gorgeous. This time, these pretty Dulce de Leche Brownies caught my attention and I gave a try.


I was contemplating for quite some time what to substitute for the eggs in this recipe. Silken Tofu had been a good substitute many a times. Unfortunately, I didn't have it at hand. I was not sure what else would work best without compromising the taste and texture. Time was running and I had to get them ready before evening. After much thought, I gave up and just used eggs. In fact, I was baking for friends and I'm more than happy if they like it [though I can't taste it :( ].

The original recipe can be found here. I followed all the measurements exactly as mentioned, except adding Dulce de Leche a bit more generously. The spreading of DDL on the brownie batter was real fun. I waited an anxious 30 minutes. The result was visibly wonderful. I just let it cool completely, took few snaps quickly and off to the party.

The verdict from the friends was that it tasted absolutely wonderful. My husband was glad to describe more precisely. He found that the brownies tasted a little bit on the bitter side, yet very very tasty to his palates. He found little islands of soft DDL in the brownies which added more to the taste, along with the crunchy nuts in between. The texture was soft and just like he would expect a brownie to be. What more to say?!


I just can't wait for the day when I would try an eggless version of these beauties. Waiting to secure the next pack of DDL again. Ya ya, it makes me get indulged!! But, who wouldn't want to? As a small note, I would like to add that as Divya suggests, if you have the time I mean, refrigerate them overnight and warm a little before serving. You would definitely love them!! Sending this to Blog Hop Wednesday IV.

Thursday, September 08, 2011

Bodensee

I'm back with a travel post this time!! We had taken holidays last week in view of Eid ul Fitr. This time, we were invited to our friends' house in the north of Germany. After prayers on Tuesday, we set out to their house and had a good time there. We returned home next day evening. The rest of the week was still there and it was almost like summer was slowly waving a goodbye. We wanted to go out somewhere and it was a spontaneous plan and we're glad we did it.


Constance (Konstanz in German) is a small city located on the banks of Bodensee. So, what is Bodensee? It is the third largest fresh water lake in Europe, known just as The Lake Constance in English. Not to be confused with the ones by the same name in the USA and Canada. The lake forms a natural boundary between the three countries - Germany, Switzerland and Austria. It is to the south of Germany bordering the states of Bavaria and Baden-Wuerttemberg and is fed by the River Rhine flowing from the Alps into the south of the lake. The lake is a beauty by itself, a favourite spot in Summer for sailors, sport lovers and tourists.


We started on Saturday morning by car. It was a longer drive than expected due to weekend traffic. Around 3 in the afternoon, we reached Constance and checked into our hotel. Our initial stop was to the Mainau Island. It is a small island in the lake on the German side. The entire island is maintained as a garden and is fondly called the Blumen Insel Mainau (The flower island Mainau). As the name suggests, the island is studded with numerous beautiful flowers. We reached the island by a ferry running from Constance. Right from the entrance, it is all fragrant and colourful everywhere you turn around. Different flowers bloom in different seasons. This time, Dahlias were in full bloom.


My husband was busy trying to capture all those nature's beauties into his lenses. Even I was making my own round with my mobile clicking around with excitement. There are good round trip suggestions for everyone around the island. One can easily cover the entire island by walk in a couple of hours. It was a very memorable walk through the gardens. There is a little area called Schmetterlinghaus (Butterfly house). Could you imagine how much I was amused? It housed many lovely colourful butterflies - big and small, flying all around. We were glad we got some nice clicks of these winged beauties too. The trip back to Constance on the ferry with the decorative lightings in the evening was again wonderful and memorable.


The next day was expected to be raining. We rightly chose to stay indoors and made a visit to the Sea Life. Sea Life is a chain of aquariums in Europe and the USA. It was in my wish list for a long time to visit the aquarium. The life under water is always a fascination to me. Do you know the octopuses are highly intelligent and have a good memory and problem solving skills? Do you know the sharks must always keep swimming so as to avoid sinking?


We got to see lot of flora and fauna in the aquarium including star fish, jelly fish, clown fish (the Nemo fish), rays, sharks, turtles, sea horses, octopuses and of course, penguins and lots of other small and large fishes. I also got to touch a star fish and it was an extra-ordinary experience. The aquarium is surely a great experience for children and adults alike!!


After lunch, we started our drive back to home. It was mostly raining during the travel, but the traffic was quite ok. Thus, our holidays came to an end and from Monday, back to work and the routine continues. Yet, it was a memorable little picnic during the weekend and I'm eager to make another little trip. Hopefully soon!! :)

Information:
Insel Mainau
Sea Life at Constance
Lake Constance Wiki
Mainau Wiki

Thursday, September 01, 2011

For the 7 links challenge

I've been blogging for quite some time now and it is a time to reflect upon my work so far. Priya of Now Serving has invited me to play the game of the 7 links challenge. Thank you Priya for giving me this wonderful opportunity, where I get the chance to look back and do a self-rating of my posts so far.

1. The most beautiful post

This one has been real tough. Each post has been written with commitment and prepared with compassion. When both these elements come together, the end result would indeed be beautiful. Anyhow, for the game's sake, let me name a couple of them which are close to my heart: Bruges


and Hello in there


2. The most popular post

Strawberry Shortcake Cookies - This one was quite easy to choose. I just oriented myself on the number of comments received.


3. The most controversial post.

I do not have any.

4. The most helpful post.

Lamb Biryani - Most of our friends who have visited us and tasted this Biryani have liked it and asked for the recipe. However good we explain, a written recipe is always better. I think, this is also my longest post so far. I am happy that I have taken the pains to write down all the step by step instructions with pictures and documented it for ever, so that anyone can refer to it anytime. That way, it rightly deserves to be called the most helpful post.


5. A post that was surprisingly successful.

Kohlrabi Dhal Curry - I never expected this post would gain so much popularity. I have also noted that many google search has directed to this post of mine and I'm of course, happy about that.


6. A post that did not get the attention it deserves.

Risotto ai Funghi - This is a very yummy Italian recipe, which I'm also proud of getting it right at the very first try. Back then, I did not have as much as readers as today and so it naturally went less noticed.


7. A post I am most proud of.

Basil Pesto - There are many reasons why I'm proud of this post. Trying a dish from a foreign cuisine is not always easy. That too making it the traditional way is quite a challenge. I'm glad that it tasted very authentic and lasted long on my very first try. Apart from that, the snaps have come out beautiful and it was the first one to be accepted by Foodgawker ;-)


Hope you continue to support my blogging journey as ever. So, why end the fun here? I'm taking the privilege to tag the following fellow bloggers too:

1. Shilpi Bose of It is Tasty Ma
2. Nashira of Plateful
3. Priya Sreeram of Bon Appetit
4. Nisha of Look Who's Cooking too
5. Ambreen of Simply Sweet 'n Savoury
6. Umm Mymoonah of Taste of Pearl City
7. Aipi of US Masala

And hey, the list is not limited. If you have not yet been tagged, but feel like it is fun to share your thoughts, feel free to join the challenge. :)

Raisins Bread Knots


It was a wonderful month of Ramadan. I still can't believe it is over very soon. Eid was on Tuesday for us. It was a lovely day and on the Almighty's grace, it went on very well. We had been invited to a friends' house in the north of Germany. After prayers, we set out there and we had a memorable time there. We returned home only very late last night. This post is exclusively for the Blog Hop Wednesday, a blog event by Radhika of Tickling Palates. Even before Eid, I explained my situation to her and she kindly gave me one day excuse. So, I'm posting for the event today.

This time, I got the opportunity to visit Neha's blog - From my heart. Her blog is young, but within a short time, she has posted some really wonderful and unique recipes. I really liked a few of them and had a tough time choosing. At last, I asked my husband to pick one. He finally closed in on these cute little bread knots.


The original recipe can be found here. I followed it almost exactly, except for the following changes:

  • I omitted washing the bread knots with egg-whites. Instead, I brushed the knots with a little olive oil before baking. This gave the knots a beautiful upper crust.
  • I added some raisins along with the flour while kneading, which was a great idea indeed. We really loved biting into those sweet pieces. (Ok baba, I admit, it was my husband's idea!!) 
  • I used Nigella seeds instead of Basil seeds.
I enjoyed preparing these pretty knots very much. They were easy to make, but tasted great. Initially, I wondered how to make those knots, but later realized that it doesn't really matter. It was fun twisting and turning the dough. Unleash your creativity and you get wonderful shapes. I think, most of mine turned out to be like snails rather than knots. As I said, it really doesn't matter. We took some of these to our friends too and they too liked it a lot.


It is best served warm. You can either bite into them as such or enjoy with marmalade or honey. A dash of honey is my personal choice. Have it as breakfast or as tea time snacks. I'm sure you would like them either way. Sending this to Blog Hop Wednesday - Week 3.